
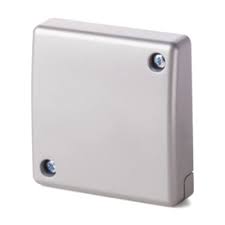
The range of seismic detectors from Vanderbilt are specifically designed for round-the-clock monitoring of safes, automated teller machines (ATMs), night deposits, strong rooms and modular vaults and protection against vandalism and theft. Easy to install and program, the seismic detectors offer one of the highest detection range and false alarm immunity on the market, and are optimized for installation on steel, concrete and synthetic composite materials.
The combination of advanced digital signal processing and the SenstecTM bimorph sensor technology enables any mechanical or thermal attack to be immediately detected: The intruder alarm is triggered repeatedly during the attack, giving ample time for intervention before the intruder has managed to gain access to the valuables or serious structural damage is done.
This seismic detection technology also ensures that environmental disturbances are ignored, and false alarms eliminated.
Vibration sensors, also called seismic sensors, are used to detect intrusion attempts by mechanical means, such as drilling or making holes through walls or safes.
Support for seismic sensors is available only if the installation type for the panel is ‘Financial’.
There are several ways to test seismic sensors. The simplest way to test seismic sensors is by hitting a wall or safe and seeing if the zone opens during a walk test. This means of testing is available with all types of seismic sensors.
If the seismic sensor is installed with a test transmitter, the following test options are available:
- Manual testing initiated at the keypad (not supported by the browser);
- Automatic testing on a periodic basis or when the panel is set using the keypad.
The test transmitter is a small high frequency vibrator that is attached a short distance from the sensor on the same wall. The test transmitter is wired to an output on the panel or an expander.
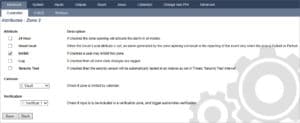
Configuring Seismic Sensors in the SPC
- Configure a seismic zone. Seismic sensors must be assigned to a zone
2. Set the attributes for the zone.
- Enable automatic testing of the sensor with the Seismic Test attribute.
- Select a calendar to control the seismic zone, if required.
- Assign this zone to a verification zone if audio/video verification is required.
- Configure timers to specify how often to test seismic zones (default is 7 days) and the duration of the tests. (Automatic Seismic Test zone attribute must be set). (See system Timers.)
Configure an output for testing a seismic zone
The output can be assigned to either the system or an area if the panel is configured to use areas as is usually the case in financial environments. The output should only be assigned to the system if the panel does not use areas.
Using the Keypad
- Select FULL ENGINEER > ZONES > (select zone) > ZONE TYPE > SEISMIC.
- Select FULL ENGINEER > ZONES > (select zone) > ATTRIBUTES > SEISMIC AUTOTEST.
