
MF1040

MF1050
The following describes the basic process for enabling Access Control on your SPC Panel using the MF1040, MF1050 range of readers and Mifare cards.
The Default Setup is for 2 single doors Entry only.
WIEGAND Wiring
Below describes the Default access setup on SPC using the reader.
The readers must be wired as Wiegand to work on SPC.
There are two types of Readers
- MF1050/MF1050E -Keypad Version - Pin & Proximity ACTPROMF_1050E
- MF1040/ MF1040e - Keypad Version - Proximity Only ACTPROMF_1040E

NOTE
Remember the connection between 0V and Sense
In SPC setting, the profile have to assigned to "Profile 2 (AR618X)"
| MF1040/1050 | SPC A210 |
| Terminals | Terminals |
| 0V | 0V |
| 12-24V | +12V |
| CLK | D1 |
| Data | D0 |
| Grn | VA1 |
| Red | VD1 |
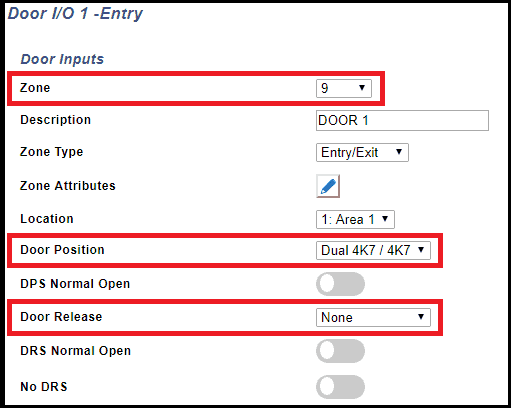
The system automatically allocates two Zones for each door:
The Door Position EOL value, by default, is set as Dual 4k7/4k7.
The Door Release (Exit Request) EOL is set as NONE (no resistor).
The Door Release zone is by default set as UNUSED so it can be used as exit request.
The DPS (Door Position Switch) inputs, on the Door Expander (SPCA210), are used for monitoring if the door has been opened, Closed, Left Open, etc and gives an indicator for the system to start the entry timer.
(DPS1 is for Door 1 and DPS2 is for Door 2).
The system expects a 4k7 resistance across the DPS & 0v inputs when the door is closed.
(Default - 4k7 Closed, 9k4 Open)
You can change the resistor value on any zone to match the value used in the door contact
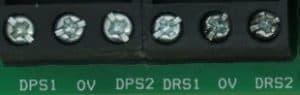
The DRS (Door Release Switch) inputs, on the SPCA210 Expander, are used for the Exit Request Switch. (RTE, REX, Egress, etc.)
(DRS1 is for Door 1 and DRS2 is for Door 2).
The Door Release EOL is set as NONE by default, so the system expects to see a short across the DRS & 0V inputs but can be inverted
(Default - Short when Closed, INF when Open).
Default Setup (2 single doors)
SPC Configuration
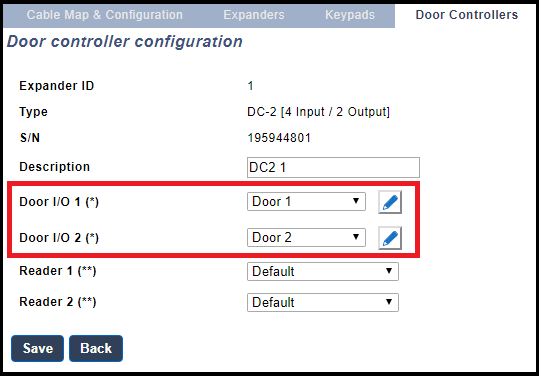
The following setup assumes that there is a Door Expander working on the system, with two readers wired into the Reader 1 & 2 connections and that the Door Position Inputs (DPS) have Contacts wired in and working.
The systems default door setup is for both Reader 1 & 2 - Entry with Card Only.
Each door is automatically allocated two Zones.
In the example below, Door 1 has Zones 9 & 10 and Door 2 has Zones 11 & 12.
For Access Control to work on SPC there are several specific features that must be set up.
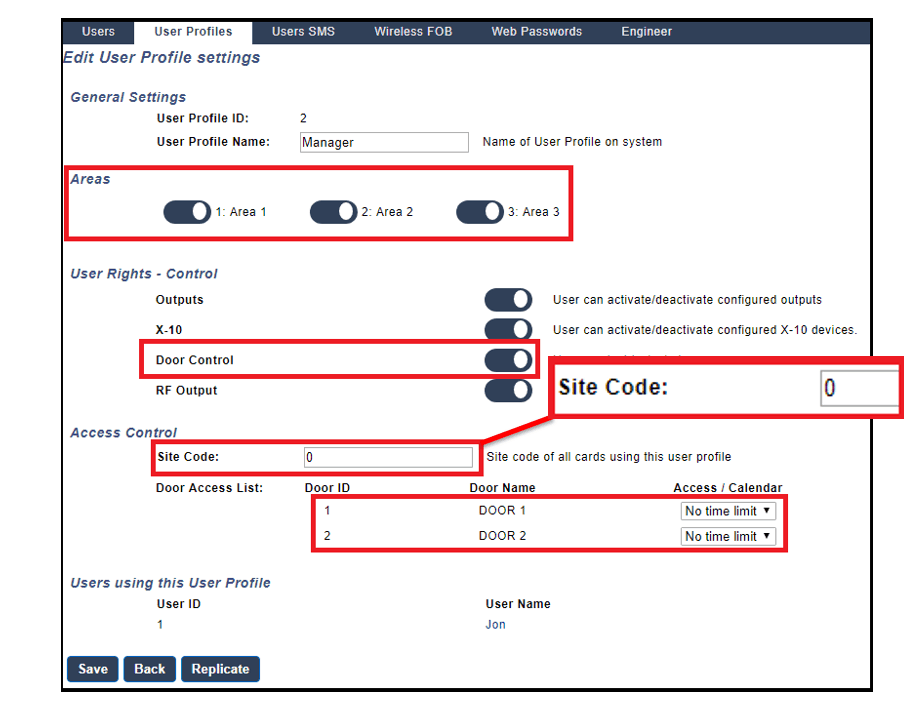
User Profile
- The USER PROFILE used must have Door Control
- Select which AREAS the user has access to.
- Select which DOORS the user can control either 24Hrs or via a Calendar.
- The site code must be the same as the cards used.
When a card is learned onto the system, if the site code is different to the profile, then Invalid Code is displayed on the keypad followed by the new code for (2 secs).
This Site Code must be changed to the new code, in the User profiles, for the cards to work.
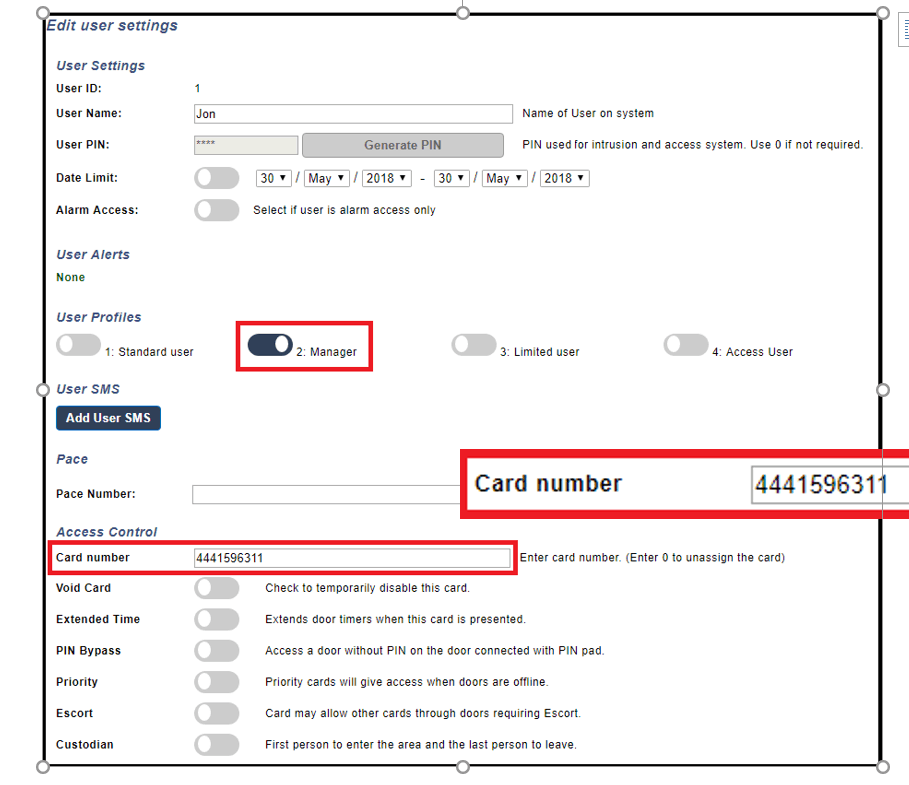
User setup
- Create / Edit a USER and select the USER PROFILE.
- Add a CARD to the User.
Either Learn a Card onto the system via the Reader.
(Full Engineer > Users > Edit > Access Control > Learn Card > Select Door)
Badge the Card on the reader to Add the card to the User.
or enter the number manually.
This is only possible for EM Cards.
To manually add a card, the original card number must be converted into an SPC number using the Card Converter tool available from Tech Support.
(SPC can only recognize a 10-digit code but may also work for different card types).
NOTE
To manually Add / Change a Card number via the keypad
(Full Engineer > User > Edit > Access Control > Edit Card > Card Number)
or enter the number manually, in the USER, in SPC Pro or via the Browser.
The Door Expander (SPCA210) configuration should be left as default, as Readers 1 & 2 are both used for Entry only.
NOTE
For the Entry Timer to work the Zone Type must be set as ENTRY/EXIT.
System Operation

- When the system is Fullset
Presenting a valid card (or Pin if Enabled) to the reader will release the door lock associated with that reader.
If you open the Door, the Door Position switch detects the door has physically opened so starts the Entry timer for the Area.
Enter the user code onto the Keypad and select Unset > Area
If the system is not Unset before the time limit is reached, then an alarm is activated.
(If you do NOT open the door the door lock closes after the timeout period).
- When the system is Unset
Enter your code on the keypad, select Fullset > Area and the exit timer will start.
Press the exit request button and exit the area, the Area Fullsets after the Exit timer has ended.
If you need to terminate the Exit timer using the exit door, you can set the associated Zone with the Final Exit attribute. This allows you to set a second timer (1- 45 second) so the system Fullsets when the outer door is Opened Then Closed and the timer ends.
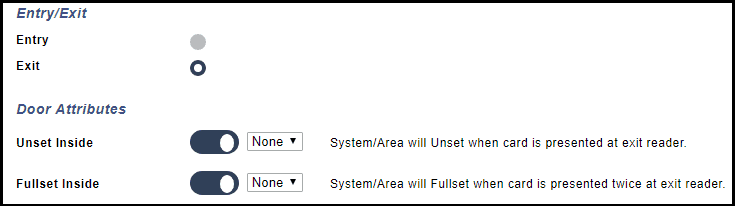
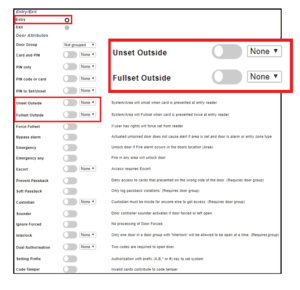
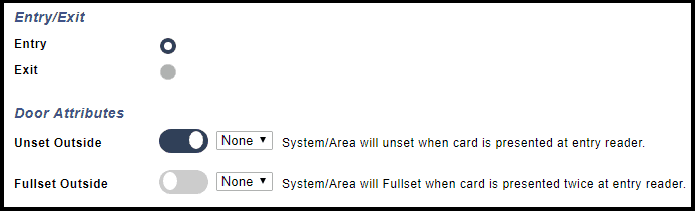
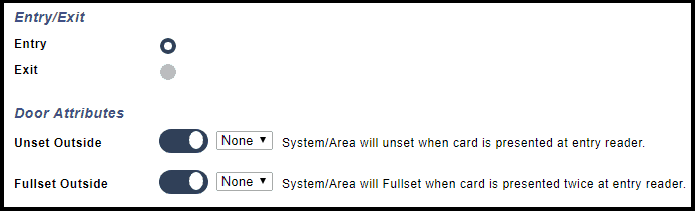
Alternative Unset / Fullset options.
Area will Unset Immediately via a single valid badge on the reader.
Area will Fullset via the keypad using the Exit Timer.
The area will Unset via a Reader valid badge & Keypad code using the Entry Timer. The area will Fullset Immediately with a double valid badge on the reader. or The area will Fullset via the keypad using the Exit Timer

The area will Unset Immediately with a single valid badge on the reader. The area will Fullset Immediately with a double valid badge on the reader. or The area will Fullset via the keypad using the Exit Timer.
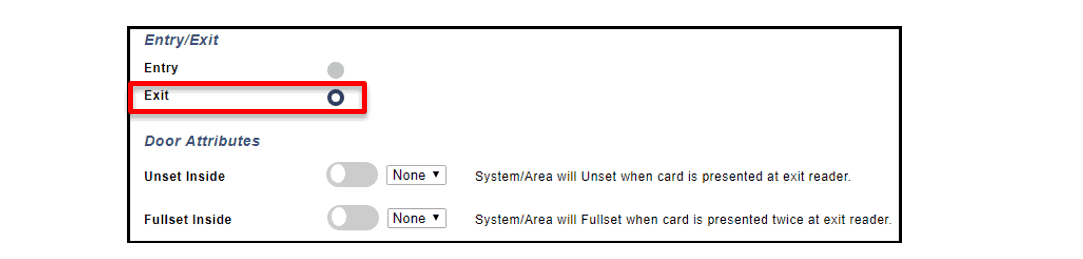
Door Type changed from Entry to Exit.
The area will Unset via a Reader valid badge & Keypad code using the Entry Timer. The area will Fullset via the keypad using the Exit Timer.
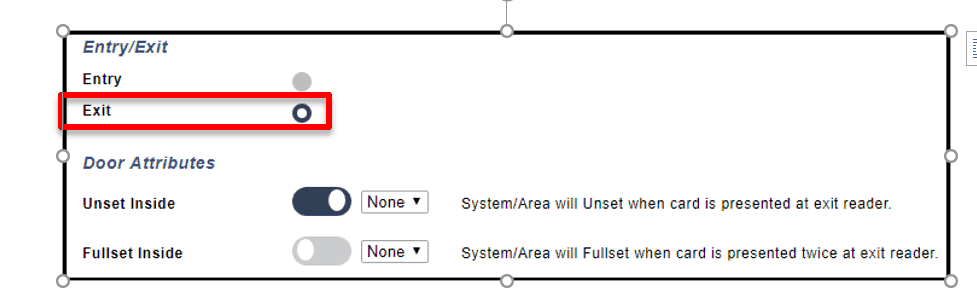
The area will Unset Immediately with a single valid badge on the reader. The area will Fullset via the keypad using the Exit Timer.
The area will Unset via a Reader valid badge & Keypad code using the Entry Timer. The area will Fullset with a double valid badge on the reader using Exit Timer. or The area will Fullset via the keypad using the Exit Timer.
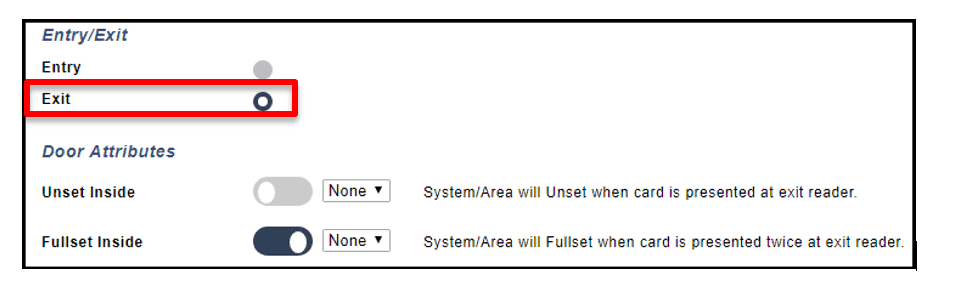
The area will Unset Immediately with a single valid badge on the reader. The area will Fullset with a double valid badge on the reader using Exit Timer. or The area will Fullset via the keypad using the Exit Timer.